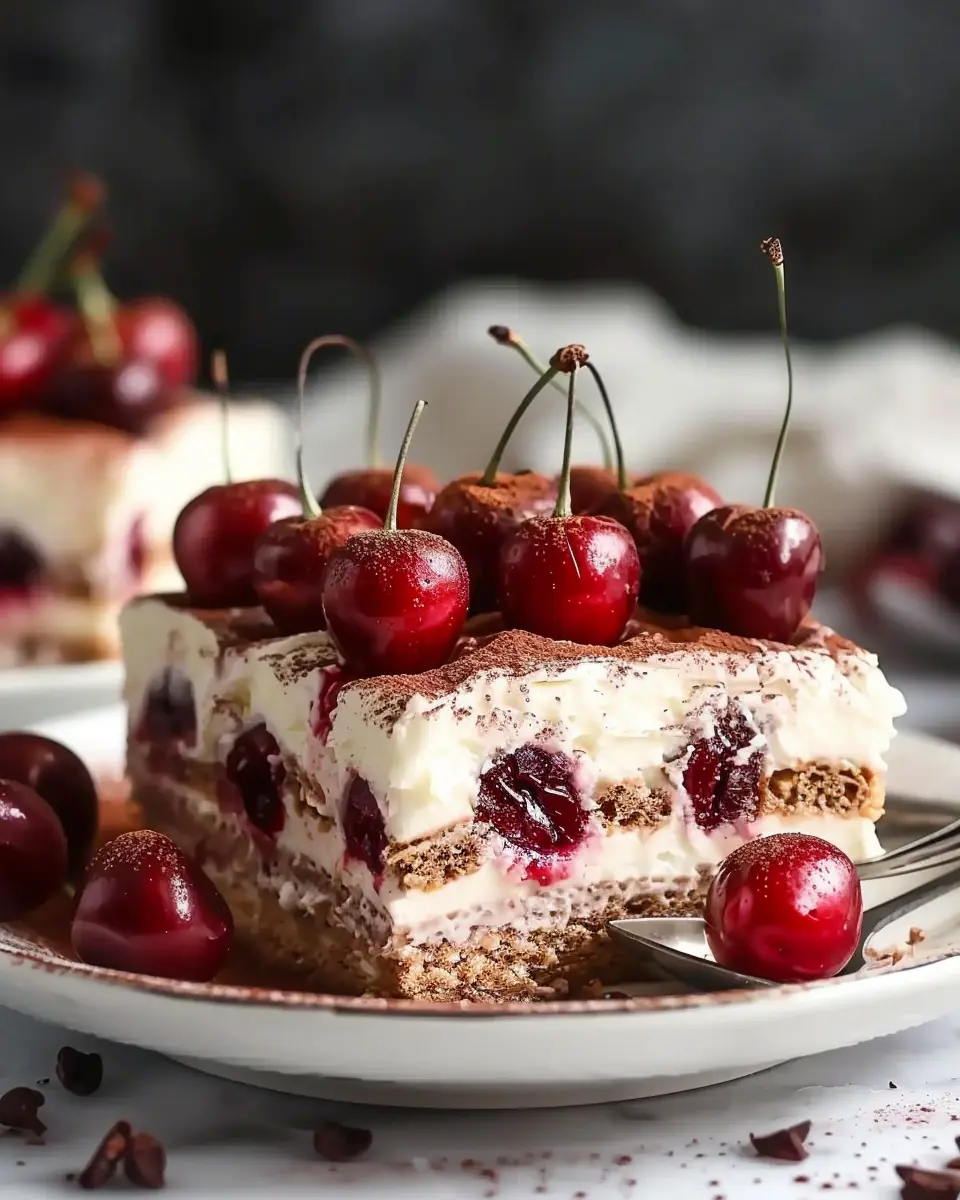
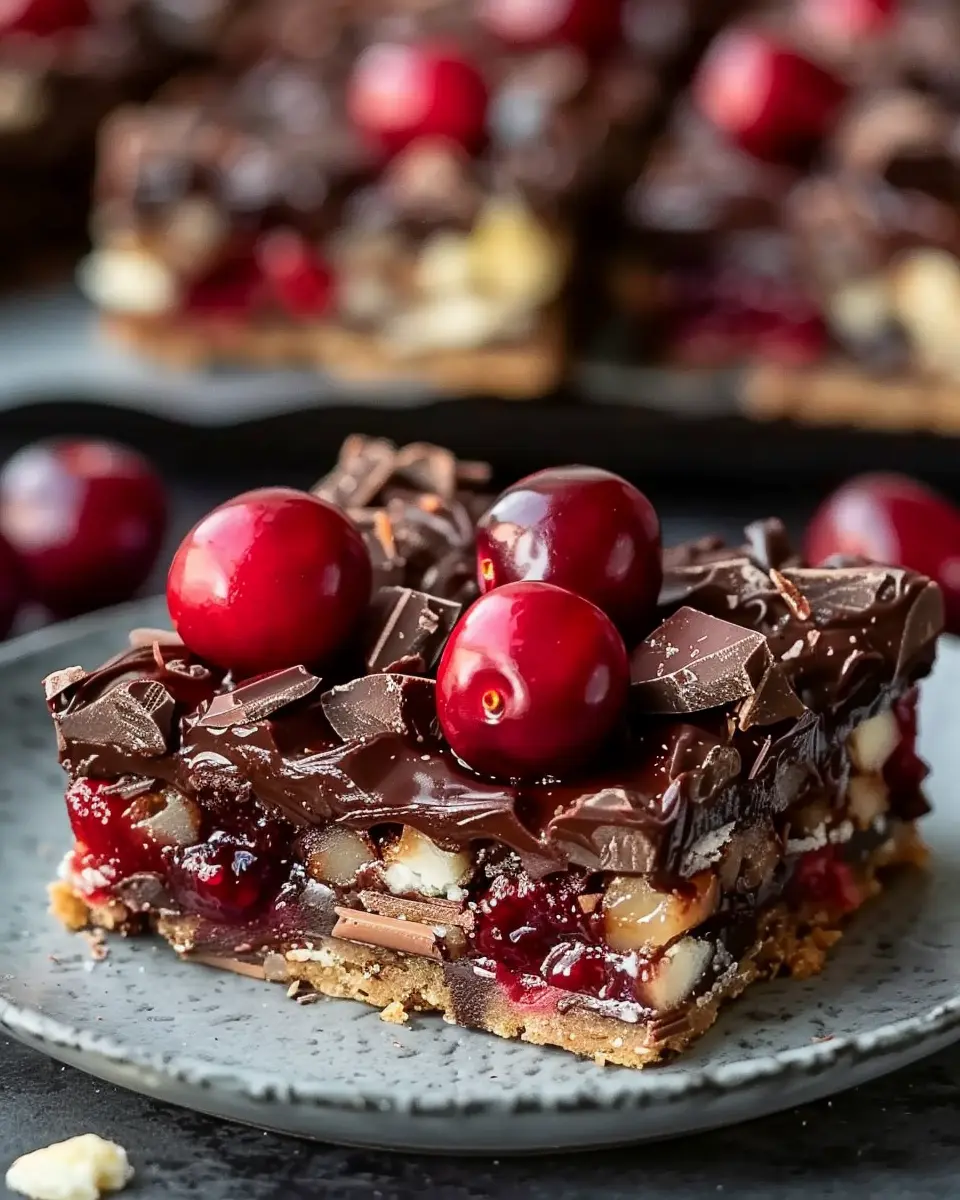
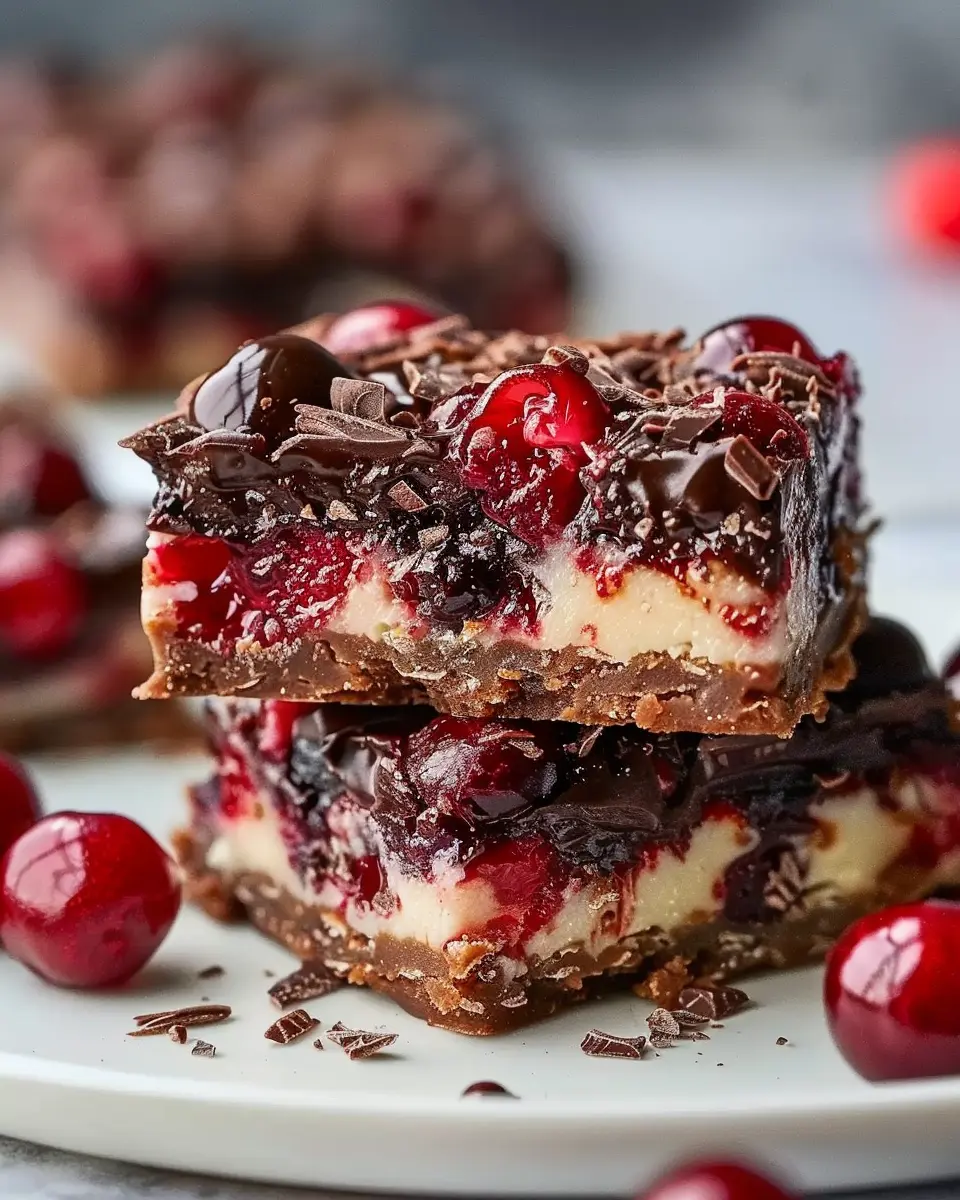
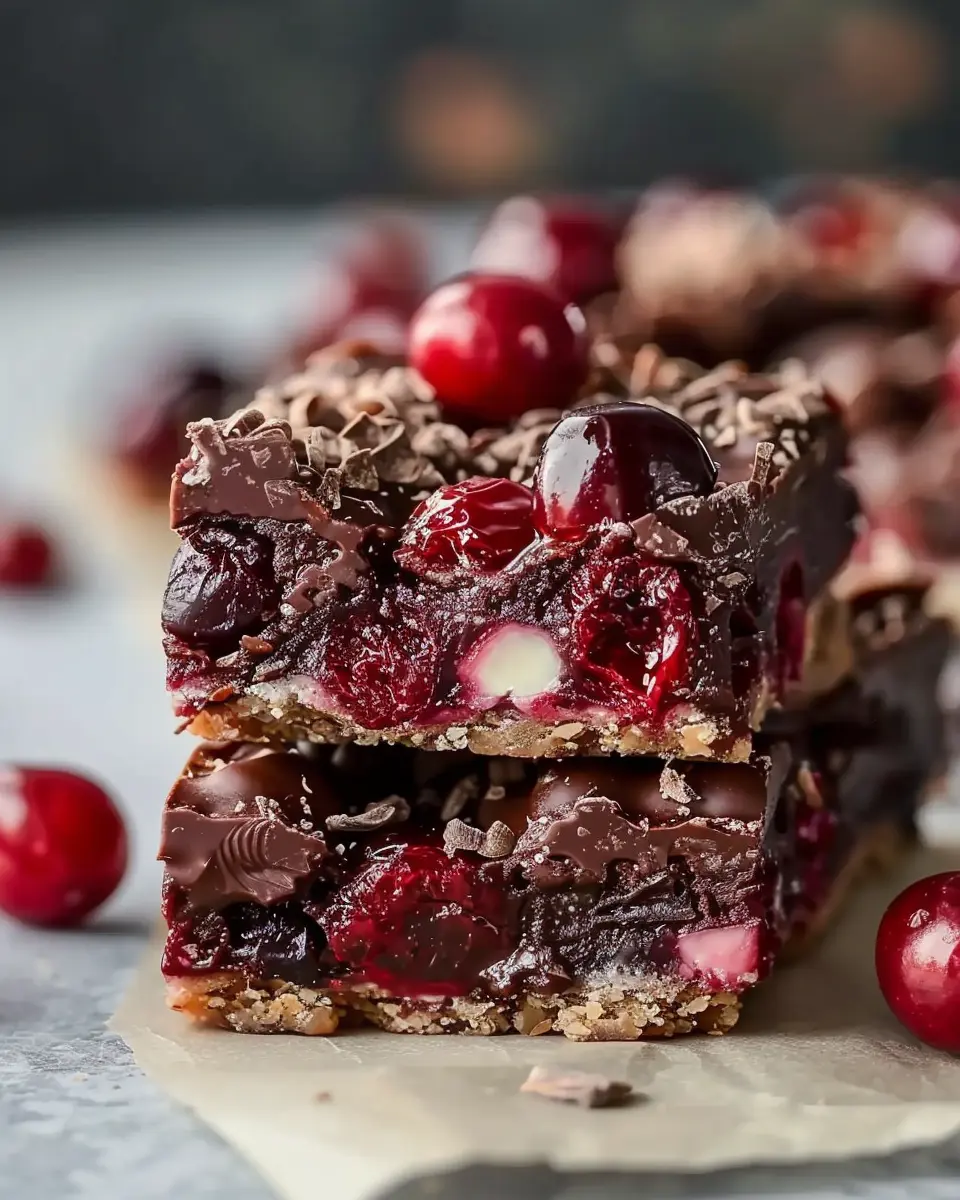
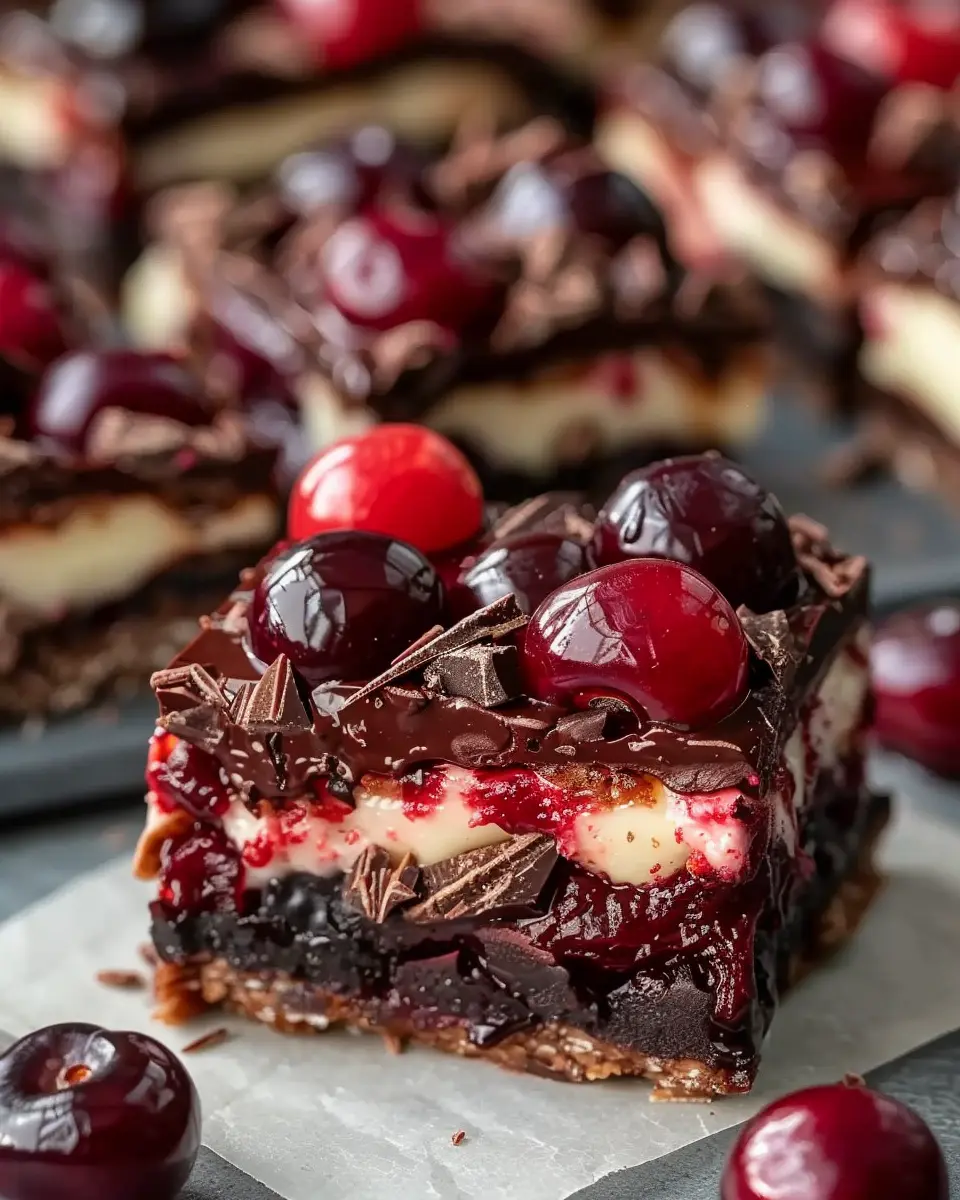
Introduction to Chocolate Covered Cherry Magic Bars
Are you looking for a dessert that’s not only a feast for the eyes but also a delightful surprise for your taste buds? Look no further than Chocolate Covered Cherry Magic Bars! These delicious treats combine sweet, tart cherries with rich chocolate goodness, creating a dessert that’s truly magical. Perfect for gatherings, celebrations, or simply indulging yourself, these bars are sure to impress.
What are Chocolate Covered Cherry Magic Bars?
Chocolate Covered Cherry Magic Bars are layered desserts packed with a variety of flavors and textures. At their core, they typically include a buttery graham cracker crust, sweetened condensed milk, and an array of toppings that can vary based on personal preference. The star of the show, however, is the combination of chocolate and cherries.
These bars are not just tasty; they are also incredibly easy to make! In a matter of minutes, you can whip up a batch that will have everyone asking for seconds. The process is rather simple:
- Start with a solid base: A mixture of crushed graham crackers and melted butter creates a delicious crust.
- Layer in the magic: Pour sweetened condensed milk over the crust, and then artfully sprinkle your toppings, including chocolate pieces and cherries.
- Bake to perfection: A quick trip to the oven allows everything to meld together beautifully, resulting in a gooey, decadent treat.
Why They’re Special
The unique flavor profile of Chocolate Covered Cherry Magic Bars stems from the balance of sweet and tart. According to a study from Food & Wine, desserts with contrasting flavors can stimulate your palate, making each bite an exciting experience. Plus, the visual appeal of chocolate drizzled over ruby-red cherries makes these bars a hit on any dessert table. You’ll surely impress your friends and family when you serve these tempting squares!
So, whether you’re planning a festive get-together or just craving something sweet, these magic bars are a fantastic choice. They’re not only delicious but also remarkably simple to prepare, making them ideal for busy young professionals who love to cook. Get ready to indulge in this delightful treat—your taste buds will thank you! For a deeper dive into the world of dessert magic bars, check out Bon Appétit’s guide to dessert layering techniques.
Ingredients for Chocolate Covered Cherry Magic Bars
When it comes to creating the perfect treat for gatherings or cozy nights at home, nothing beats the allure of Chocolate Covered Cherry Magic Bars. These bars are an indulgent blend of flavors and textures that will captivate your taste buds. But before diving into this delicious experience, let’s gather the essential ingredients!
Essential Ingredients
- Graham Cracker Crumbs: About 1 ½ cups for a buttery, crunchy base.
- Unsalted Butter: ½ cup, melted, to hold everything together beautifully.
- Sweetened Condensed Milk: One can (14 ounces) to add a creamy richness.
- Chocolate Chips: 1 cup of semi-sweet or dark chocolate chips for that rich chocolaty flavor.
- Maraschino Cherries: 1 cup, drained and roughly chopped, because cherries are the stars of this treat!
- Chopped Nuts: ½ cup (pecans or walnuts work best), adding a delightful crunch.
- Coconut Flakes: 1 cup to bring a tropical twist to the mix.
Easy to Customize
Feel free to swap in your favorite ingredients; for instance, you can use dried cherries for a chewy element or opt for white chocolate chips for a different flavor profile. Don’t forget to check out this Graham Cracker Crust Guide for tips on how to make the most of your crust!
With these pantry staples, you’re well on your way to baking your own batch of Chocolate Covered Cherry Magic Bars that are sure to impress! Ready to get started?
Step-by-Step Preparation for Chocolate Covered Cherry Magic Bars
Making Chocolate Covered Cherry Magic Bars is not only a delightful experience but also a fantastic way to pamper your sweet tooth or impress your friends at a gathering. Let’s dive into the preparation step by step, so you’ll feel confident and excited to make these delicious treats.
Preheat your oven and prepare the baking dish
First things first, preheating your oven to 350°F (175°C) is crucial. This ensures that your bars bake evenly. While the oven warms up, take a 9×13-inch baking dish and line it with parchment paper or grease it lightly with cooking spray. This will keep your magic bars from sticking and make cleanup a breeze. Trust me; you’ll thank yourself later!
Combine the dry ingredients
Next, grab a mixing bowl and combine 1 ½ cups of graham cracker crumbs, ½ cup of unsweetened cocoa powder, and 1 cup of shredded coconut. Mixing these dry ingredients not only sets the foundation for your bars but also gives them amazing flavor. Feel free to use a whisk or a fork to ensure that everything is blended evenly. Did you know that cocoa powder contains antioxidants? That’s a delicious bonus!
Melt the butter and mix with the dry ingredients
Now, in a microwave-safe bowl, melt ½ cup (one stick) of butter until it’s completely liquid. Let it cool for a minute, then pour it into your bowl of dry ingredients. Mix them together until fully combined. This will form a crumbly but cohesive mixture — your Chocolate Covered Cherry Magic Bars are starting to take shape!
Form the crust in the baking dish
Take your buttery crust mixture and press it evenly into the bottom of your prepared baking dish. You want a uniform layer so that every bite has that delightful graham cracker texture. I like to use the back of a measuring cup to get it nice and firm. This base is going to be the backbone of your bars, so give it your best!
Add chocolate chips to the crust
Once your crust is formed, sprinkle 1 cup of semi-sweet chocolate chips evenly over it. Seriously, you can never have too much chocolate! If you’re feeling adventurous, mix in some chopped nuts or even a splash of vanilla extract for an extra layer of flavor. The options are endless!
Prepare the egg mixture
In a separate bowl, crack three large eggs and beat them lightly. You can add ½ cup of granulated sugar and 1 teaspoon of vanilla extract to this mixture. Whisk until everything is well combined; the eggs create that luscious layer that will hold your magic bars together beautifully.
Pour the egg mixture over the crust
With your egg mixture ready, gently pour it over the crust and chocolate chips. You want to cover as much of the crust as possible. This will help to bind everything together and create that gooey magic we’re all looking forward to!
Add the halved maraschino cherries
Now it’s time for a pop of color! Halve a jar of maraschino cherries and scatter them over the top of your mixture. Their sweetness is heavenly, and they’ll provide a fantastic contrast to the chocolaty crust. Plus, who doesn’t love a little bit of a cherry surprise in each bite?
Bake until set
Pop your baking dish into the preheated oven and bake for about 30 to 35 minutes. Keep an eye on them — you want them to be set in the middle but still a tad soft. The edges should be slightly golden brown, and the aroma will fill your kitchen with pure bliss.
Cool and slice into bars
Once baked, remove them from the oven and let them cool completely in the pan. This can take about an hour. Once cooled, use a sharp knife to slice them into bars, and voilà, your Chocolate Covered Cherry Magic Bars are ready for serving! Store any leftovers in an airtight container, though I doubt they’ll last long.
By following these steps, you’ll have a delicious batch of Chocolate Covered Cherry Magic Bars that are sure to impress anyone lucky enough to get a taste. Don’t forget to share your baking adventures; happy baking!
Variations on Chocolate Covered Cherry Magic Bars
When it comes to Chocolate Covered Cherry Magic Bars, the options are practically limitless! Let’s dive into some fun variations that can elevate your baking game and tantalize your taste buds.
Swap Out Cherries for Other Fruits
While cherries may be the star of the show, consider swapping them out for other fruits to create your own twist. Here are some mouth-watering alternatives:
- Raspberries: Their tartness pairs beautifully with chocolate, adding a burst of flavor.
- Strawberries: Be it fresh or dried, strawberries offer a sweet balance to the richness of chocolate.
- Blueberries: Packed with antioxidants, these little gems give your bars a juicy pop.
- Dried Apricots: Their chewy texture and unique sweetness can provide a delightful variation.
Have fun with fruit selections! Fresh vs. dried options can create different textures, allowing you to customize each batch. For more on substituting fruits, check out resources from The Fruit for Thought.
Experiment with Different Types of Chocolate
Your choice of chocolate can dramatically change the final flavor profile. Why not mix it up? Here are some ideas:
- Dark Chocolate: Opt for dark chocolate for a richer, slightly bitter experience.
- White Chocolate: This will add a creamy sweetness, perfect if you’re using tart fruits.
- Milk Chocolate: Classic and loved by many, it balances well with most ingredients.
What’s even better? You can layer different types of chocolate for a multi-dimensional taste. Consider using chocolate chips, chunks, or even melting down bars for a gooey layer. If you’re curious about the health benefits of different chocolate types, check out Healthline.
Incorporating these variations into your Chocolate Covered Cherry Magic Bars not only makes the process fun but also allows you to cater to different palates and preferences. Happy baking!
Cooking Tips and Notes for Chocolate Covered Cherry Magic Bars
Ensuring proper measurement of ingredients
Accurate measurements are crucial for creating the best Chocolate Covered Cherry Magic Bars. Use a kitchen scale for dry ingredients like flour and sugar, as even slight variations can affect texture. When dealing with sticky ingredients like melted chocolate or syrup, consider using measuring cups that are specifically designed to handle such viscous substances. It makes the process smoother and ensures you’re adding just the right amount.
Best type of pan for baking
Choose a sturdy, metal baking pan for optimal heat conduction. A 9×13-inch pan is ideal for Chocolate Covered Cherry Magic Bars, allowing for even baking and easy portioning. If you prefer a crisper bottom layer, opt for a non-stick version, or line it with parchment paper to ease cleanup.
Shortcuts for preparation
Short on time? No worries! You can use store-bought cherry pie filling to save on prep time, and pre-made cookie crusts can also work in a pinch. You might even find pre-chopped nuts or chocolate chips at your local grocery store. These small tweaks can significantly cut down your cooking time without sacrificing flavor.
For more tips on ingredient selection, check out The Spruce Eats for expert advice. Happy baking!
Serving Suggestions for Chocolate Covered Cherry Magic Bars
Pairing with Ice Cream
Looking to elevate your Chocolate Covered Cherry Magic Bars experience? Consider serving them warm alongside a scoop of vanilla or cherry ice cream. The contrast of the creamy ice cream with the fudgy texture of the bars adds a delightful twist. For an extra touch, drizzle some chocolate syrup or a sprinkle of chopped nuts on top of the ice cream for added flavor and texture. This easy combo not only satisfies the sweet tooth but also creates a stunning dessert presentation!
Ideas for Serving at Gatherings
Hosting a gathering? Chocolate Covered Cherry Magic Bars are a hit for any occasion. Cut them into bite-sized squares and serve them on a decorative platter—perfect for parties or casual get-togethers. You can even pair them with a selection of finger foods like fruit skewers or cheese platters to provide a balanced spread. Another fun idea is to create a dessert bar, allowing guests to customize their bars with toppings like whipped cream, sprinkles, or extra cherries.
For more dessert inspiration, check out this article on easy party desserts.
These serving suggestions will ensure your Chocolate Covered Cherry Magic Bars shine at any event!
Time Breakdown for Making Chocolate Covered Cherry Magic Bars
Preparation Time
Making Chocolate Covered Cherry Magic Bars starts with about 15 minutes of prep time. This is when you gather your ingredients, line the baking dish, and mix your base. Having everything ready to go makes the process feel effortless!
Baking Time
Once prepped, baking takes around 30 minutes. During this time, you’ll savor the delightful aroma filling your kitchen. It’s the perfect opportunity to catch up on your favorite show or enjoy a quick snack while you wait!
Total Time
In total, expect to dedicate about 45 minutes from start to finish. You’ll soon have a delicious batch of Chocolate Covered Cherry Magic Bars ready to impress family and friends. With this timeline in mind, it’s easy to see why these bars are a beloved sweet treat!
If you’re curious about ingredient options or details, check out sources like Baker’s Journal for more baking tips or The Kitchn for ideas on creative variations!
Nutritional Facts for Chocolate Covered Cherry Magic Bars
When indulging in Chocolate Covered Cherry Magic Bars, you might be curious about what they’re adding to your daily nutrition. Here’s a quick breakdown:
Calories per bar
Each bar typically contains around 200 calories. While they are a delightful treat, be mindful of portion sizes if you’re keeping an eye on calorie intake.
Sugar content
These bars pack a sweet punch, averaging around 15 grams of sugar each. Considering the rich flavors of chocolate and cherries, it’s a satisfying yet sugary indulgence.
Key nutrients
These Chocolate Covered Cherry Magic Bars are not just about sweetness—they also offer some nutrients:
- Fiber: Aiding digestion, thanks to cherries and nuts.
- Antioxidants: Dark chocolate contains flavonoids that support heart health.
- Vitamins: Cherries provide vitamin C and potassium for a nutrient boost.
For more information on nutrition in snacks, check out the USDA FoodData Central for comprehensive details!
FAQs about Chocolate Covered Cherry Magic Bars
If you’re anything like me, you might have some burning questions about these delightful Chocolate Covered Cherry Magic Bars. No worries, I’ve got you covered! Let’s dive into some of the most frequently asked questions:
Can I use fresh cherries instead of maraschino cherries?
Absolutely! While maraschino cherries lend a sweet, nostalgic flavor, fresh cherries can add a lovely tartness that complements the rich chocolate perfectly. Just make sure to pit and chop them finely to ensure they mix well into the bars. You can also consider dark chocolate to enhance that contrast even more! For tips on selecting the best cherries, check out FreshCherryTips.com.
How should I store leftovers?
If, and that’s a big if, you have any leftovers from your delightful Chocolate Covered Cherry Magic Bars, store them in an airtight container at room temperature for up to five days. If you notice them getting a bit soft, a quick trip to the refrigerator can help maintain their texture. Just remember to bring them back to room temperature before indulging again!
Can these bars be frozen?
Of course! Freezing Chocolate Covered Cherry Magic Bars is an excellent way to keep them fresh for later. Wrap them tightly in plastic wrap and then place them in a freezer-safe bag. They can last up to three months in the freezer. Simply thaw them in the fridge overnight before enjoying your sweet treat again. For more tips on freezing desserts, CookingLight has some great resources.
Feel free to experiment, enjoy baking, and indulge in these sweet treats! If you have any more questions, don’t hesitate to ask!
Conclusion on Chocolate Covered Cherry Magic Bars
In conclusion, Chocolate Covered Cherry Magic Bars are more than just a dessert; they’re a delightful adventure for your taste buds. Their harmonious blend of rich chocolate, tart cherries, and a fluffy base create a treat perfect for gatherings or quiet nights in.
When you’re looking to impress friends or seeking a sweet escape after a long day, these bars hit the spot. Remember, making these bars can be a fun experience to share with loved ones. Don’t hesitate to experiment with variations—perhaps adding nuts or drizzling some caramel on top! For more baking inspiration, check out resources like King Arthur Baking. Enjoy every bite!
PrintChocolate Covered Cherry Magic Bars: Indulgent Homemade Delight
Indulge in the rich flavors of chocolate and cherries with these delectable magic bars, perfect for any occasion.
- Prep Time: 10 minutes
- Cook Time: 30 minutes
- Total Time: 40 minutes
- Yield: 12 servings 1x
- Category: Dessert
- Method: Baking
- Cuisine: American
- Diet: Vegetarian
Ingredients
- 1 cup graham cracker crumbs
- 1/2 cup unsweetened cocoa powder
- 1 can sweetened condensed milk
- 1 cup chocolate chips
- 1 cup chopped cherries
- 1/2 cup shredded coconut
Instructions
- Preheat your oven to 350°F (175°C).
- In a bowl, combine graham cracker crumbs and cocoa powder.
- Press the crumb mixture into the bottom of a greased baking pan.
- Pour the sweetened condensed milk evenly over the crust.
- Sprinkle chocolate chips, cherries, and coconut on top.
- Bake for 25-30 minutes or until the edges are golden.
- Let cool before cutting into bars.
Notes
- For added flavor, consider adding nuts or a drizzle of caramel on top.
Nutrition
- Serving Size: 1 bar
- Calories: 250
- Sugar: 18g
- Sodium: 150mg
- Fat: 10g
- Saturated Fat: 7g
- Unsaturated Fat: 3g
- Trans Fat: 0g
- Carbohydrates: 35g
- Fiber: 2g
- Protein: 3g
- Cholesterol: 0mg
Keywords: Chocolate Covered Cherry Magic Bars, dessert, bars, chocolate, cherry